Build Hosted Checkout API
1. Overview
Build provides a Hosted Checkout Page integration solution. With this solution, merchants do not need to handle complex underlying payment logic or integrate multiple SDKs on their own frontends. You only need to call the creation interface through the merchant backend to obtain a universal checkout link hosted by Build. This checkout page natively supports seamless switching between card payments and cryptocurrency payments. 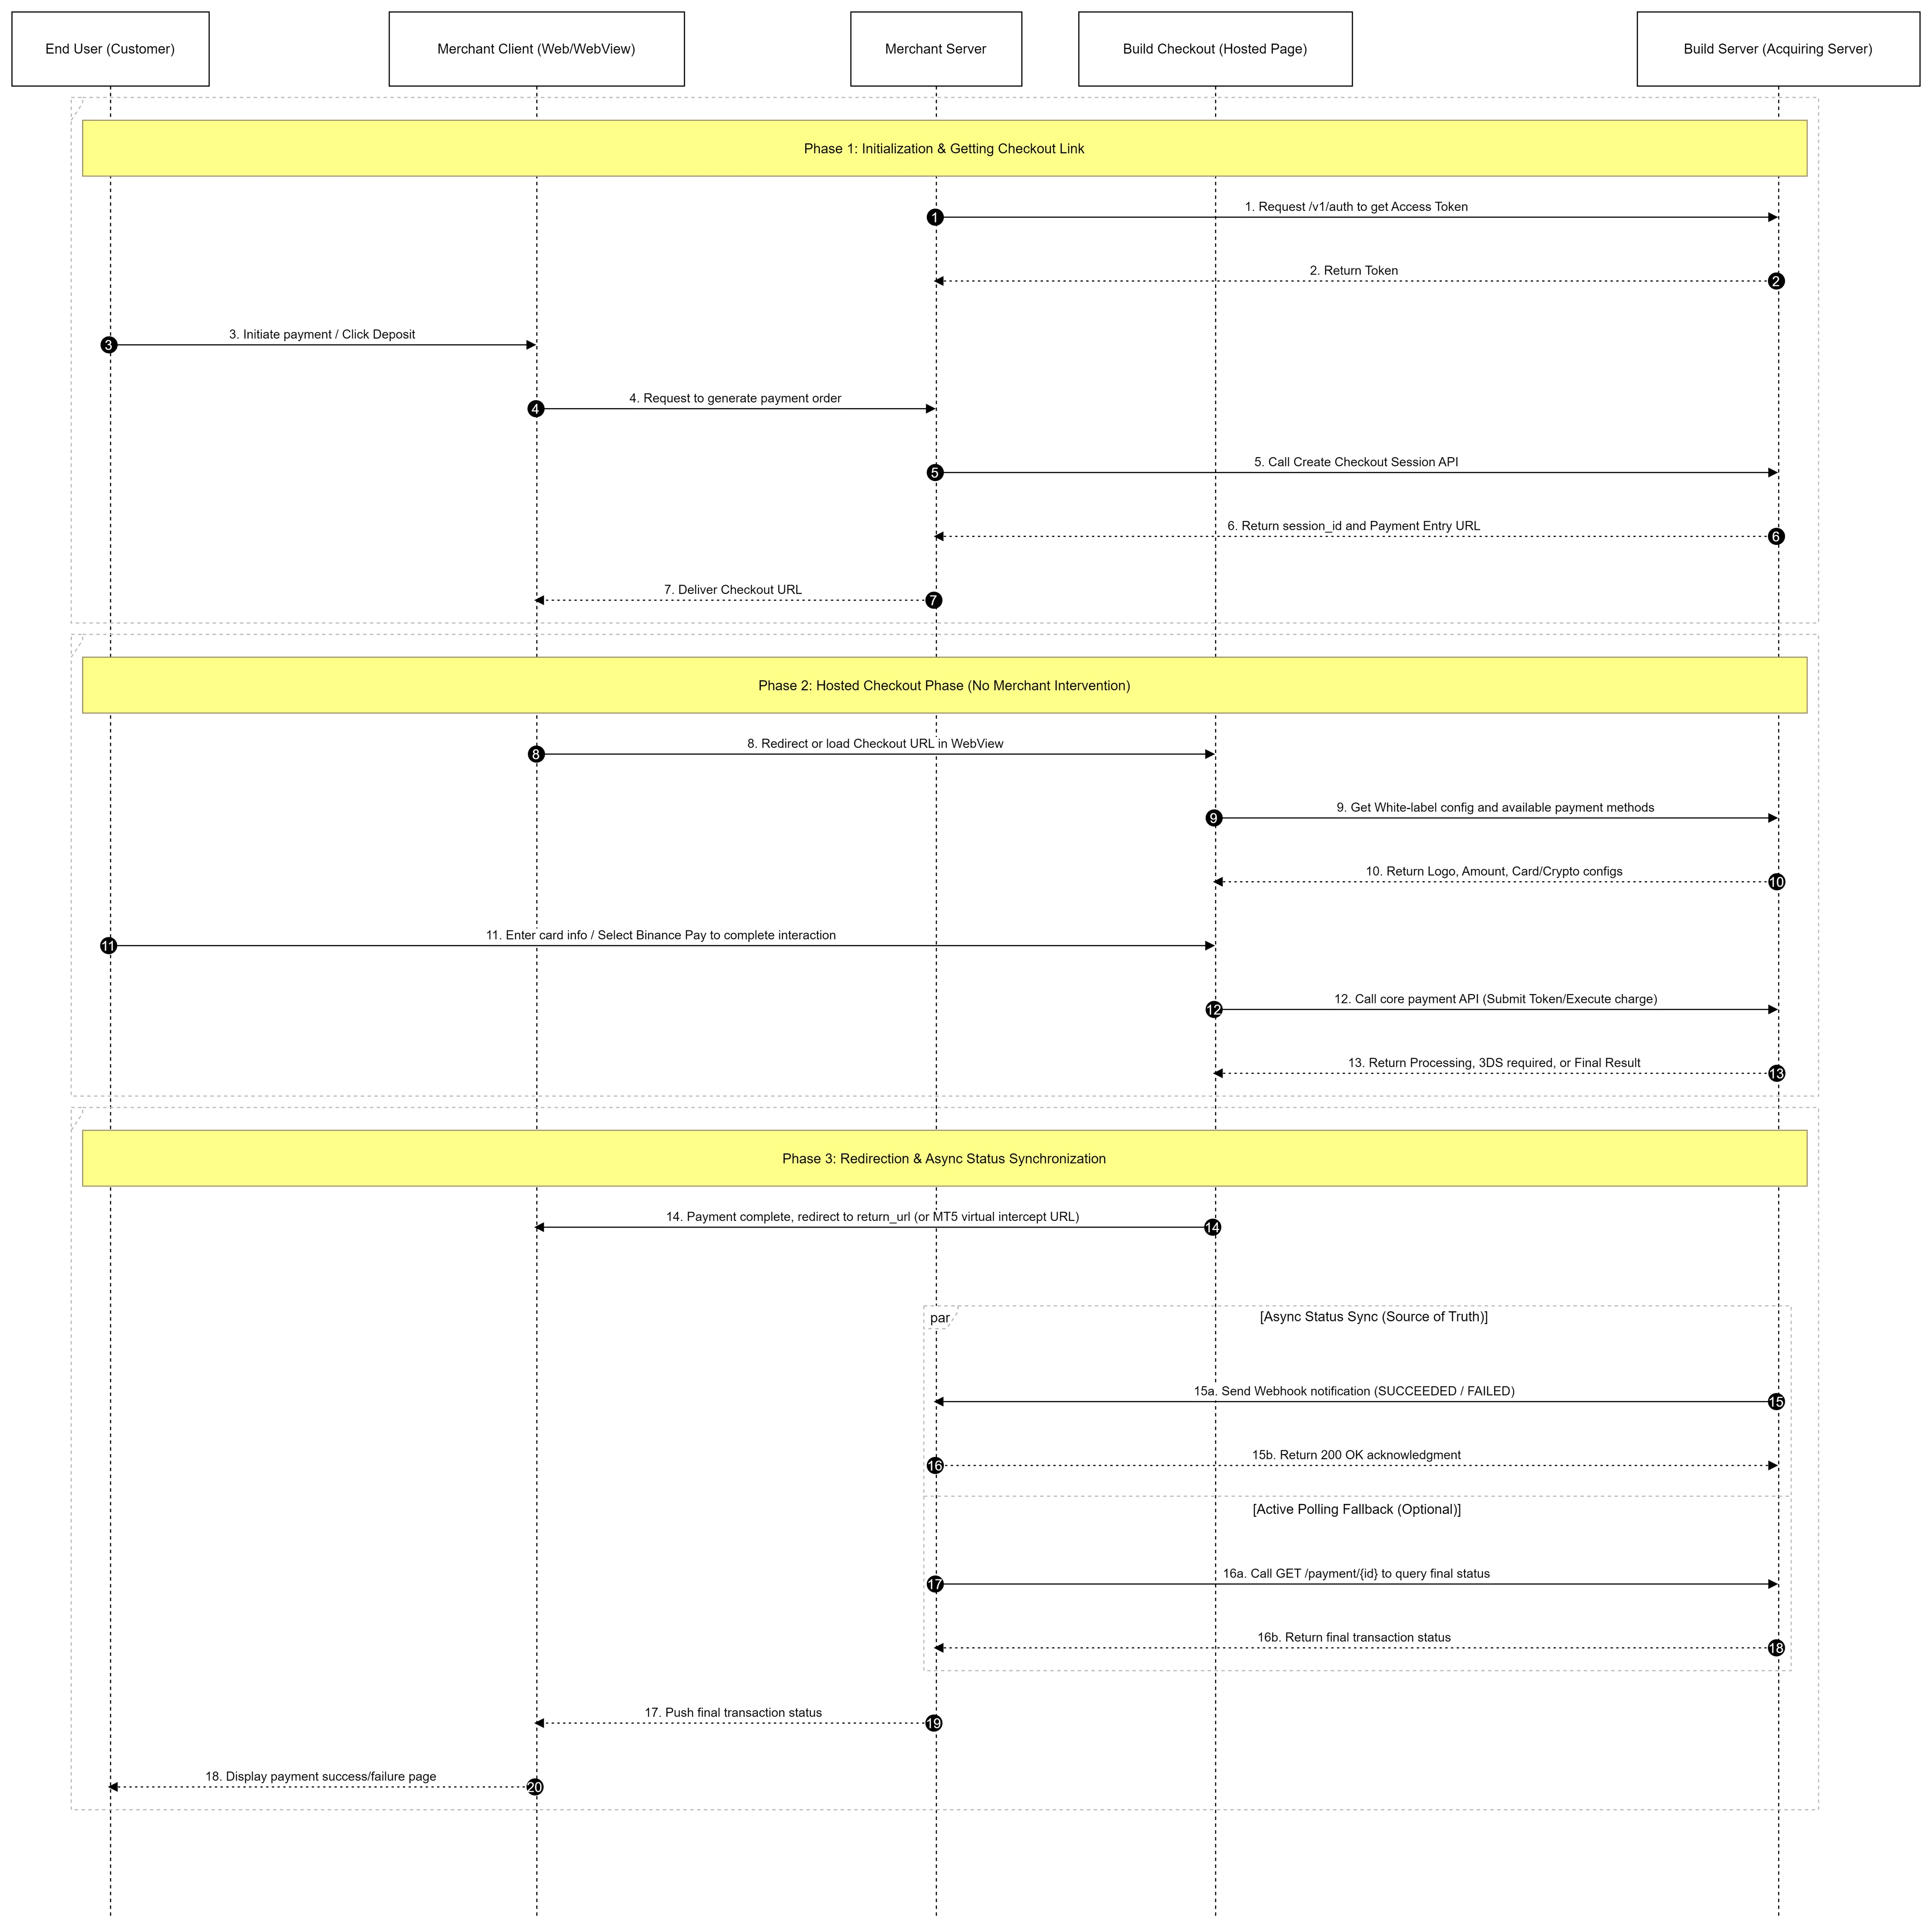
2. Authentication
The Build API uses an Api Key and Api Secret for request authentication. Do not expose these credentials in public areas such as GitHub or client-side code.
Authentication Workflow
- Your server calls the
/v1/authinterface to obtain a short-term Access Token. - Extract the token from the response and include it in the HTTP Header of all subsequent API requests:
Authorization: Bearer <your_access_token>. - Pay attention to the
expired_infield in the response; once the token expires, you must request a new one.
3. Core Integration Workflow
Step 1: Create Checkout Session (Obtain Checkout Link)
When a customer clicks to pay or deposit on your merchant frontend, your merchant server should send a request to Build to create a Checkout Session.
API Action: Backend calls the Checkout Session creation interface.
Request Parameters:
- Amount and Currency (Required):
amountandcurrency. - Page Customization (Optional): You can optionally pass
title(e.g., individual/corporate merchant name),subtitle(business identifier, e.g., "Account Deposit"), andDescription.
- Amount and Currency (Required):
Expected Response: The interface returns a
checkout_session_idand a checkout entrance page url (Payment Entry Page URL) for frontend redirection.
Step 2: Frontend Loading and User Interaction
Once the checkout URL is obtained, load the page in your frontend application. The acquiring system frontend will automatically render the merchant Logo, amount, and the list of applicable payment methods (such as switching between Cards and Crypto tabs) based on the checkout_session_id.
Redirection Handling by Client Type
- Standard Web: Directly redirect the user to the checkout page. After payment is complete, the general checkout will redirect back to the success or failure page specified by the merchant.
- Embedded WebView: Embed the checkout URL into the merchant's frontend WebView. After payment is completed (or cancelled), the page redirects to a specific virtual URL (e.g.,
payment-result/...). The merchant frontend can intercept this URL, close the payment popup, and display the operation result to the user.
Step 3: Query Final Transaction Status
Because processes such as 3DS verification or local wallet payments are asynchronous, you must verify the final status at specific nodes.
- API Interface:
GET /api/v1/acq/checkout/session/{checkout_session_id}. - Trigger Timing: a. Post-Redirect: After the user completes 3DS verification and jumps back to your
returnUrl, the frontend should notify the merchant backend to call this interface for the final status. b. Active Polling Fallback: If your system has not yet received a Webhook, you can poll the status via this interface (e.g., MT5 intercepting a virtual URL and initiating polling in parallel). - Status Note: If the interface returns
PROCESSING, it means the banking network is still processing; please continue to wait for the asynchronous Webhook notification for the final result.
4. Asynchronous Webhook Notifications
The Webhook is your only source of truth for transaction data. It ensures your system receives the final SUCCEEDED or FAILED status even if the user closes the browser or the frontend goes offline.
Integration Best Practices
- Idempotency: Due to network retry mechanisms, you may receive the same Webhook event multiple times. Always verify the
payment_idin your database before processing; if it has already been processed, return200 OKdirectly without repeating business logic. - Respond Quickly: Your server should return a 200 status code immediately upon receiving the notification. Move time-consuming tasks (like generating PDF bills or sending emails) to a background asynchronous queue to prevent Webhook connection timeouts.
- Security Validation: To prevent forged requests, verify the signature in the request header or check if the request originates from Build's IP whitelist.
5. Sandbox Testing and Status Dictionary
In the Sandbox environment, both card payment and Binance Pay simulation are supported.
Sandbox Testing Card Information
| Scenario / Expected Result | Card Brand | Card Number | CVV |
|---|---|---|---|
| Frictionless Flow | Visa | 4111 1111 1111 1111 | Any |
| Challenge Flow | Visa | 4000 0000 0000 2503 | Any |
- CVV: Any 3 digits.
- Expiry: Any future date.
Core Status Dictionary
- INIT: Initial status after checkout session creation; expires after a certain period.
- SUCCEEDED: Transaction successful, funds have been captured.
- FAILED: Transaction failed (e.g., due to insufficient balance or risk control interception).
- PROCESSING: Transaction is being processed; please wait for the Webhook notification for the final result.
- REQUIRES_ACTION: Requires additional user action (usually redirection to complete 3DS security verification).
- EXPIRED: Status after exceeding the validity period; no operations can be performed.